Tinker源码解析-代码修复和资源修复

前言

对于Tinker的原理认识, 一直停留在粗放的认知层面上, 但是对于代码修复的细节原理, 关于资源修复原理, dex差分包的算法原理都没有亲自看一遍源码, 因此关于Tinker会分为两篇进行源码解读工作.

Tinker代码修复原理

补丁生效, 是在我们应用重启后生效的, 我们可以从TinkerApplication开始看下源码

1
2
3
4
5
6
7
8
9
10
11
12
13
14
15
16
17
18
19
private void onBaseContextAttached(Context base) {
try {
...
loadTinker();
mCurrentClassLoader = base.getClassLoader();
mInlineFence = createInlineFence(this, tinkerFlags, delegateClassName,
tinkerLoadVerifyFlag, applicationStartElapsedTime, applicationStartMillisTime,
tinkerResultIntent);
TinkerInlineFenceAction.callOnBaseContextAttached(mInlineFence, base);
//reset save mode
if (useSafeMode) {
ShareTinkerInternals.setSafeModeCount(this, 0);
}
} catch (TinkerRuntimeException e) {
throw e;
} catch (Throwable thr) {
throw new TinkerRuntimeException(thr.getMessage(), thr);
}
}

Tinker在application启动走到attachBaseContext时, 会调用onBaseContextAttached, 最后走到loadTinker .loadTinker主要做的就是通过TinkerApplication的类加载器去加载loaderClassName, 如果开发者没有自定义配置, 那么这里加载的类就是TinkerLoader, 然后调用他的tryLoad方法

1
2
3
4
5
6
7
8
9
10
11
12
13
14
15
// TinkerApplication.java
private void loadTinker() {
try {
//reflect tinker loader, because loaderClass may be define by user!
Class<?> tinkerLoadClass = Class.forName(loaderClassName, false, TinkerApplication.class.getClassLoader());
Method loadMethod = tinkerLoadClass.getMethod(TINKER_LOADER_METHOD, TinkerApplication.class);
Constructor<?> constructor = tinkerLoadClass.getConstructor();
tinkerResultIntent = (Intent) loadMethod.invoke(constructor.newInstance(), this);
} catch (Throwable e) {
//has exception, put exception error code
tinkerResultIntent = new Intent();
ShareIntentUtil.setIntentReturnCode(tinkerResultIntent, ShareConstants.ERROR_LOAD_PATCH_UNKNOWN_EXCEPTION);
tinkerResultIntent.putExtra(INTENT_PATCH_EXCEPTION, e);
}
}
1
2
3
4
5
6
7
8
9
10
11
// TinkerLoader.java
public Intent tryLoad(TinkerApplication app) {
Log.d(TAG, "tryLoad test test");
Intent resultIntent = new Intent();

long begin = SystemClock.elapsedRealtime();
tryLoadPatchFilesInternal(app, resultIntent);
long cost = SystemClock.elapsedRealtime() - begin;
ShareIntentUtil.setIntentPatchCostTime(resultIntent, cost);
return resultIntent;
}
1
2
3
4
5
6
7
8
9
10
11
12
13
14
15
16
17
18
19
20
21
22
23
24
25
26
27
28
29
30
31
32
33
34
35
36
37
38
39
40
41
42
43
44
45
46
47
48
49
50
51
52
53
54
55
56
57
58
59
60
61
62
63
64
65
66
// TinkerLoader.java
private void tryLoadPatchFilesInternal(TinkerApplication app, Intent resultIntent) {
// 补丁加载前一些校验代码
...

final boolean isEnabledForDex = ShareTinkerInternals.isTinkerEnabledForDex(tinkerFlag);
// 是否华为鸿蒙OS
final boolean isArkHotRuning = ShareTinkerInternals.isArkHotRuning();
// 资源, dex, so的校验
...

//only work for art platform oat,because of interpret, refuse 4.4 art oat
//android o use quicken default, we don't need to use interpret mode
boolean isSystemOTA = ShareTinkerInternals.isVmArt()
&& ShareTinkerInternals.isSystemOTA(patchInfo.fingerPrint)
&& Build.VERSION.SDK_INT >= 21 && !ShareTinkerInternals.isAfterAndroidO();

//now we can load patch jar
if (!isArkHotRuning && isEnabledForDex) {
// 代码补丁加载
boolean loadTinkerJars = TinkerDexLoader.loadTinkerJars(app, patchVersionDirectory, oatDex, resultIntent, isSystemOTA, isProtectedApp);

if (isSystemOTA) {
// update fingerprint after load success
patchInfo.fingerPrint = Build.FINGERPRINT;
patchInfo.oatDir = loadTinkerJars ? ShareConstants.INTERPRET_DEX_OPTIMIZE_PATH : ShareConstants.DEFAULT_DEX_OPTIMIZE_PATH;
// reset to false
oatModeChanged = false;

if (!SharePatchInfo.rewritePatchInfoFileWithLock(patchInfoFile, patchInfo, patchInfoLockFile)) {
ShareIntentUtil.setIntentReturnCode(resultIntent, ShareConstants.ERROR_LOAD_PATCH_REWRITE_PATCH_INFO_FAIL);
Log.w(TAG, "tryLoadPatchFiles:onReWritePatchInfoCorrupted");
return;
}
// update oat dir
resultIntent.putExtra(ShareIntentUtil.INTENT_PATCH_OAT_DIR, patchInfo.oatDir);
}
if (!loadTinkerJars) {
Log.w(TAG, "tryLoadPatchFiles:onPatchLoadDexesFail");
return;
}
}

// 忽略鸿蒙适配代码
...

//now we can load patch resource
if (isEnabledForResource) {
// 资源补丁加载
boolean loadTinkerResources = TinkerResourceLoader.loadTinkerResources(app, patchVersionDirectory, resultIntent);
if (!loadTinkerResources) {
Log.w(TAG, "tryLoadPatchFiles:onPatchLoadResourcesFail");
return;
}
}

// Init component hotplug support.
if ((isEnabledForDex || isEnabledForArkHot) && isEnabledForResource) {
ComponentHotplug.install(app, securityCheck);
}
// 省略部分代码
// 包括 杀死主进程以外tinker相关的进程
// 回调加载成功的通知
...
return;
}

TinkerLoader#tryLoadPatchFilesInternal主要是做以下几件事情:

  1. Tinker 功能的验证(包括 Tinker是否打开, 清单文件的获取和校验)
  2. 当前执行进程的判断, 当前执行路径需要在主进程内
  3. 补丁文件, 补丁内容(包括dex, resource, so)与清单的校验, 并将相关信息对象存入对应列表对象
  4. 代码补丁的加载(TinkerDexLoader.loadTinkerJars)
  5. 资源补丁的加载(TinkerResourceLoader.loadTinkerResources)
  6. 杀死主进程以外的进程

基于大量代码, 这里就不列出来了, 在TinkerDexLoader.loadTinkerJars主要是针对如果设置了tinkerLoadVerifyFlag, 则会进行一些md5安全校验, 然后针对OAT做的一些补丁优化处理, 然后通过SystemClassLoaderAdder.installDexes执行安装补丁的工作

1
2
3
4
5
6
7
8
9
10
11
12
13
14
15
16
17
18
19
20
21
22
23
24
25
26
27
28
29
30
31
32
33
34
35
36
37
// SystemClassLoaderAdder.java
public static void installDexes(Application application, ClassLoader loader, File dexOptDir, List<File> files, boolean isProtectedApp)
throws Throwable {
Log.i(TAG, "installDexes dexOptDir: " + dexOptDir.getAbsolutePath() + ", dex size:" + files.size());

if (!files.isEmpty()) {
// 针对dex进行排序
files = createSortedAdditionalPathEntries(files);
// 获取TinkerDexLoader的类加载器, 因为没有指定特定的类加载器处理, 所以用的应该是DVM下的PathClassloade
ClassLoader classLoader = loader;
// 非加固应用的apk并且sdk大于等于24
if (Build.VERSION.SDK_INT >= 24 && !isProtectedApp) {
classLoader = NewClassLoaderInjector.inject(application, loader, dexOptDir, files);
} else {
//because in dalvik, if inner class is not the same classloader with it wrapper class.
//it won't fail at dex2opt
if (Build.VERSION.SDK_INT >= 23) {
V23.install(classLoader, files, dexOptDir);
} else if (Build.VERSION.SDK_INT >= 19) {
V19.install(classLoader, files, dexOptDir);
} else if (Build.VERSION.SDK_INT >= 14) {
V14.install(classLoader, files, dexOptDir);
} else {
V4.install(classLoader, files, dexOptDir);
}
}
//install done
sPatchDexCount = files.size();
Log.i(TAG, "after loaded classloader: " + classLoader + ", dex size:" + sPatchDexCount);

if (!checkDexInstall(classLoader)) {
//reset patch dex
SystemClassLoaderAdder.uninstallPatchDex(classLoader);
throw new TinkerRuntimeException(ShareConstants.CHECK_DEX_INSTALL_FAIL);
}
}
}

根据不同的sdk编译版本, tinker做了适配处理, 我们看下V23.install(classLoader, files, dexOptDir)

1
2
3
4
5
6
7
8
9
10
11
12
13
14
15
16
17
18
19
20
21
22
23
24
// V23.java
private static void install(ClassLoader loader, List<File> additionalClassPathEntries,
File optimizedDirectory)
throws IllegalArgumentException, IllegalAccessException,
NoSuchFieldException, InvocationTargetException, NoSuchMethodException, IOException {
/* The patched class loader is expected to be a descendant of
* dalvik.system.BaseDexClassLoader. We modify its
* dalvik.system.DexPathList pathList field to append additional DEX
* file entries.
*/
Field pathListField = ShareReflectUtil.findField(loader, "pathList");
Object dexPathList = pathListField.get(loader);
ArrayList<IOException> suppressedExceptions = new ArrayList<IOException>();
ShareReflectUtil.expandFieldArray(dexPathList, "dexElements", makePathElements(dexPathList,
new ArrayList<File>(additionalClassPathEntries), optimizedDirectory,
suppressedExceptions));
if (suppressedExceptions.size() > 0) {
for (IOException e : suppressedExceptions) {
Log.w(TAG, "Exception in makePathElement", e);
throw e;
}

}
}

可以看到, 最终, Tinker是通过hook 类加载器内的的pathList对象, 通过调用`DexPathList#makeDexElements, 替换DexPathList对象内的dexElements集合对象, 至此就算Dex补丁加载完成.

Tinker的代码补丁加载代码流程我们已经过了一遍, 回头我们再看下为什么代码补丁修复的原理, 首先我们需要理解类加载机制以及Android中的类加载器.

类加载机制以及Android的类加载器

我们都知道Android的类加载机制, 都是沿用了JVM的双亲委派模型, 那么什么是双亲委派模型?

双亲委派模型要求除了顶层的启动类加载器外, 其余的类加载器都应有自己的父类加载器. 当一个类加载器收到了类加载的请求, 它首先不会自己去尝试加载这个类, 而是把这个请求委派给父类加载器去完成, 每一个层次的类加载器都是如此, 因此所有的加载请求最终都应该传送到最顶层的启动类加载器中, 只有当父加载器反馈自己无法完成这个加载请求(它的搜索范围中没有找到所需的类)时, 子加载器才会尝试自己去完成加载. –<深入理解Java虚拟机>

要知道DVM中是否也是沿用双亲委派机制, 我们可以看下代码

1
2
3
4
5
6
7
8
9
10
11
12
13
14
15
16
17
18
19
20
21
22
23
24
25
26
27
28
29
30
// /libcore/ojluni/src/main/java/java/lang/ClassLoader.java
protected Class<?> loadClass(String name, boolean resolve)
throws ClassNotFoundException
{
// 检查对应的类是否已经被加载过了
// First, check if the class has already been loaded
Class<?> c = findLoadedClass(name);
if (c == null) {
try {
if (parent != null) {
c = parent.loadClass(name, false);
} else {
c = findBootstrapClassOrNull(name);
}
} catch (ClassNotFoundException e) {
// ClassNotFoundException thrown if class not found
// from the non-null parent class loader
// 如果父类加载器抛出, 说明父类加载器无法完成加载请求
}

if (c == null) {
// If still not found, then invoke findClass in order
// to find the class.
// 在父类加载器无法加载时
// 再调用本身的findClass方法来进行加载
c = findClass(name);
}
}
return c;
}

可以看出, 在Android中当需要加载一个类的时候, 也是沿用一样的机制, 当类已经加载, 则使用被加载的类, 否则调用父加载器的loadClass, 如果父加载器为空, 则使用启动类加载器作为父加载器, 如果父类加载器加载失败, 才调用自己的findClass方法进行加载.

Android的类加载器与JVM中的类加载器区别在于, 它加载的是Dex, 而不是Class文件, 我们看下8.0系统下Android类加载器的继承情况
Android8.0ClassLoader继承
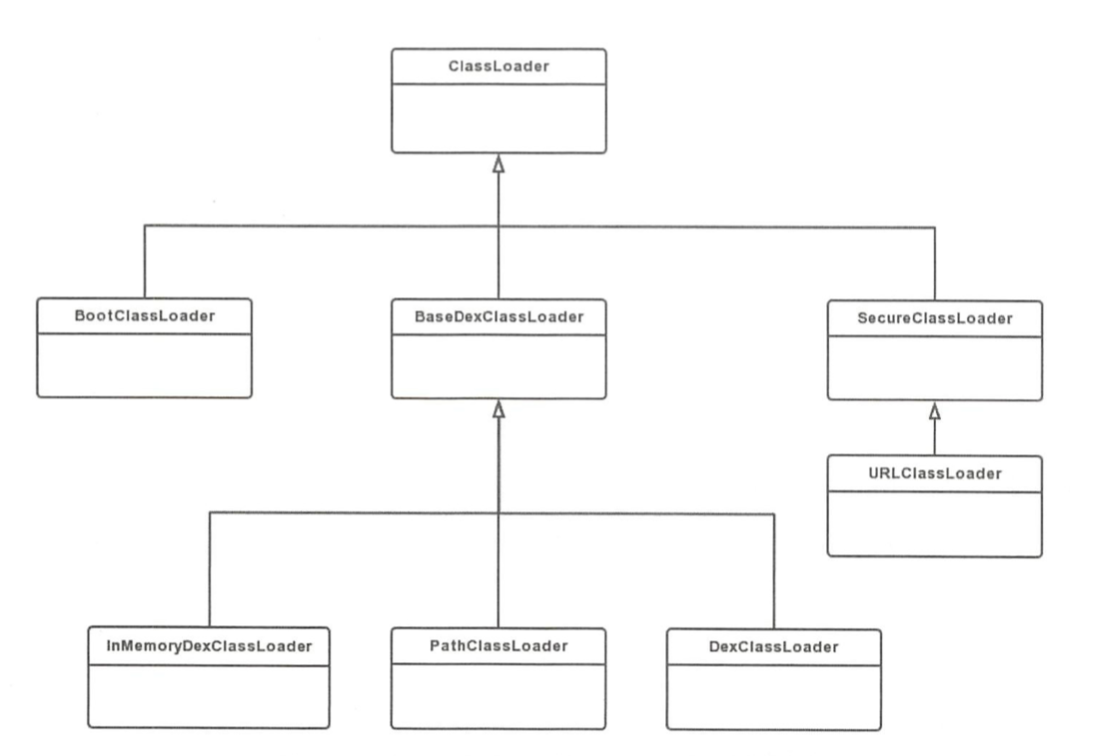
通过日志打印, 我们可以看到我们主要用到的ClassLoader是PathClassLoader

1
2
3
4
5
6
7
8
9
10
11
// /libcore/dalvik/src/main/java/dalvik/system/PathClassLoader.java
public class PathClassLoader extends BaseDexClassLoader {

public PathClassLoader(String dexPath, ClassLoader parent) {
super(dexPath, null, null, parent);
}

public PathClassLoader(String dexPath, String librarySearchPath, ClassLoader parent) {
super(dexPath, null, librarySearchPath, parent);
}
}

PathClassLoader是用来Android用来加载应用类和系统类的加载类, 构造函数的第一个入参dexPath是dex相关文件路径集合, 通过”:”分隔,
librarySearchPath表示so文件路径集合, 用文件分隔符分隔, 可能为空.它继承于BaseDexClassLoader, 具体方法由父类实现, 以下截取了部分代码,具体源码可以看这里

1
2
3
4
5
6
7
8
9
10
11
12
13
14
15
16
17
18
19
20
21
22
23
24
25
26
27
28
29
30
31
32
public class BaseDexClassLoader extends ClassLoader {

private final DexPathList pathList;

public BaseDexClassLoader(String dexPath, File optimizedDirectory,
String librarySearchPath, ClassLoader parent) {
super(parent);
this.pathList = new DexPathList(this, dexPath, librarySearchPath, null);

}


@Override
protected Class<?> findClass(String name) throws ClassNotFoundException {
List<Throwable> suppressedExceptions = new ArrayList<Throwable>();
// 通过DexPathList查找类
Class c = pathList.findClass(name, suppressedExceptions);
if (c == null) {
ClassNotFoundException cnfe = new ClassNotFoundException(
"Didn't find class \"" + name + "\" on path: " + pathList);
for (Throwable t : suppressedExceptions) {
cnfe.addSuppressed(t);
}
throw cnfe;
}
return c;
}

@Override public String toString() {
return getClass().getName() + "[" + pathList + "]";
}
}

根据源码可以看到, BaseDexClassLoader在创建的时候, 内部维护了一个DexPathList对象, 当查找类, Resource, Dex或So的时候, 都是通过DexPathList间接获取

1
2
3
4
5
6
7
8
9
10
11
12
13
14
15
16
17
18
19
20
21
22
23
24
25
26
27
28
29
30
31
32
33
34
35
36
37
38
39
40
41
42
43
44
45
46
47
48
49
50
51
52
53
54
55
56
57
58
59
60
61
62
63
64
65
66
67
68
69
70
71
72
73
74
75
76
77
78
79
80
81
82
83
84
85
86
87
88
89
90
91
92
93
94
95
96
97
98
99
100
101
102
103
104
105
106
107
108
109
110
111
112
113
114
115
// /libcore/dalvik/src/main/java/dalvik/system/DexPathList.java
final class DexPathList {
private Element[] dexElements;

public DexPathList(ClassLoader definingContext, String dexPath,
String librarySearchPath, File optimizedDirectory) {
...

ArrayList<IOException> suppressedExceptions = new ArrayList<IOException>();
// save dexPath for BaseDexClassLoader
this.dexElements = makeDexElements(splitDexPath(dexPath), optimizedDirectory,
suppressedExceptions, definingContext);
...
// 省略其他代码
}

/**
* 返回一个dex资源集合
* Makes an array of dex/resource path elements, one per element of
* the given array.
*/
private static Element[] makeDexElements(List<File> files, File optimizedDirectory,
List<IOException> suppressedExceptions, ClassLoader loader) {
Element[] elements = new Element[files.size()];
int elementsPos = 0;
/*
* Open all files and load the (direct or contained) dex files up front.
*/
for (File file : files) {
if (file.isDirectory()) {
// We support directories for looking up resources. Looking up resources in
// directories is useful for running libcore tests.
elements[elementsPos++] = new Element(file);
} else if (file.isFile()) {
String name = file.getName();

if (name.endsWith(DEX_SUFFIX)) {
// Raw dex file (not inside a zip/jar).
try {
DexFile dex = loadDexFile(file, optimizedDirectory, loader, elements);
if (dex != null) {
elements[elementsPos++] = new Element(dex, null);
}
} catch (IOException suppressed) {
System.logE("Unable to load dex file: " + file, suppressed);
suppressedExceptions.add(suppressed);
}
} else {
DexFile dex = null;
try {
dex = loadDexFile(file, optimizedDirectory, loader, elements);
} catch (IOException suppressed) {
/*
* IOException might get thrown "legitimately" by the DexFile constructor if
* the zip file turns out to be resource-only (that is, no classes.dex file
* in it).
* Let dex == null and hang on to the exception to add to the tea-leaves for
* when findClass returns null.
*/
suppressedExceptions.add(suppressed);
}

if (dex == null) {
elements[elementsPos++] = new Element(file);
} else {
elements[elementsPos++] = new Element(dex, file);
}
}
} else {
System.logW("ClassLoader referenced unknown path: " + file);
}
}
if (elementsPos != elements.length) {
elements = Arrays.copyOf(elements, elementsPos);
}
return elements;
}

private static DexFile loadDexFile(File file, File optimizedDirectory, ClassLoader loader,
Element[] elements)
throws IOException {
if (optimizedDirectory == null) {
return new DexFile(file, loader, elements);
} else {
String optimizedPath = optimizedPathFor(file, optimizedDirectory);
return DexFile.loadDex(file.getPath(), optimizedPath, 0, loader, elements);
}
}

/**
* Finds the named class in one of the dex files pointed at by
* this instance. This will find the one in the earliest listed
* path element. If the class is found but has not yet been
* defined, then this method will define it in the defining
* context that this instance was constructed with.
*
* @param name of class to find
* @param suppressed exceptions encountered whilst finding the class
* @return the named class or {@code null} if the class is not
* found in any of the dex files
*/
public Class<?> findClass(String name, List<Throwable> suppressed) {
for (Element element : dexElements) {
Class<?> clazz = element.findClass(name, definingContext, suppressed);
if (clazz != null) {
return clazz;
}
}

if (dexElementsSuppressedExceptions != null) {
suppressed.addAll(Arrays.asList(dexElementsSuppressedExceptions));
}
return null;
}
}

PathClassLoader在找一个类的时候, 通过DexPathList#findClass, 会内部对dexElements数组进行遍历, 实际通过Element#findClass去找类, 如果找到则立即返回, 而dexElements数组对象, 在DexPathList初始化时, 通过makeDexElements方法构造对应数组, 这里Element是DexPathList的静态内部类, 它的findClass方法最终调用到了DexFile#loadClassBinaryName方法

1
2
3
4
5
6
7
8
9
10
11
12
13
14
15
16
17
18
19
20
21
22
23
24
25
26
27
28
29
30
31
32
33
34
35
36
37
/*package*/ static class Element {
/**
* A file denoting a zip file (in case of a resource jar or a dex jar), or a directory
* (only when dexFile is null).
*/
private final File path;

private final DexFile dexFile;

private ClassPathURLStreamHandler urlHandler;
private boolean initialized;

/**
* Element encapsulates a dex file. This may be a plain dex file (in which case dexZipPath
* should be null), or a jar (in which case dexZipPath should denote the zip file).
*/
public Element(DexFile dexFile, File dexZipPath) {
this.dexFile = dexFile;
this.path = dexZipPath;
}

public Element(DexFile dexFile) {
this.dexFile = dexFile;
this.path = null;
}

public Element(File path) {
this.path = path;
this.dexFile = null;
}

public Class<?> findClass(String name, ClassLoader definingContext,
List<Throwable> suppressed) {
return dexFile != null ? dexFile.loadClassBinaryName(name, definingContext, suppressed)
: null;
}
}

由此我们大概理顺了Tinker代码修复的原理:

  1. 根据类加载机制, 当一个类被加载后, 当再次请求加载类时, 会先判断对应请求类是否已加载, 如果已加载, 则直接返回
  2. 则Tinker只要保证包含修复代码的dex在原来的dex之前被加载, 即可保证修复生效
  3. 因为Tinker会针对dex进行排序, 新dex放在之前, 自行生成的testDex放在最后
  4. 通过hook获取BaseDexClassLoader内部的pathList对象, 通过DexPathListmakeDexElements方法重新设置内部elements数组, 使得ClassLoader在调用findClass的时候, 可以首先去找到补丁相关的类, 使得后面orginal class不会被加载

Tinker资源修复

资源加载与获取流程

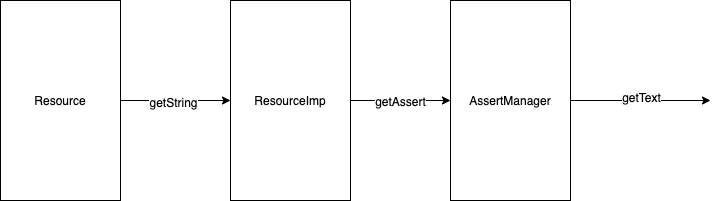
在看Tinker资源修复原理之前, 我们需要了解下资源的获取和加载原理.当我们在调用getResources时, 实际调用的是内部mBasegetResources, 已知, Activity继承于ContextWrapper, 它内部维护一个ContextImpl类的mBase对象(见下图), 所以我们主要看的是ContextImpl#getResource方法
Context
ContextImpl#getResource是获取内部的mResources,它是通过ContextImpl#createResources赋值生成, 而它的内部是通过ResourceManager去获取Resource

1
2
3
4
5
6
7
8
9
10
11
12
13
14
15
16
17
18
19
20
private static Resources createResources(IBinder activityToken, LoadedApk pi, String splitName,
int displayId, Configuration overrideConfig, CompatibilityInfo compatInfo) {
final String[] splitResDirs;
final ClassLoader classLoader;
try {
splitResDirs = pi.getSplitPaths(splitName);
classLoader = pi.getSplitClassLoader(splitName);
} catch (NameNotFoundException e) {
throw new RuntimeException(e);
}
return ResourcesManager.getInstance().getResources(activityToken,
pi.getResDir(),
splitResDirs,
pi.getOverlayDirs(),
pi.getApplicationInfo().sharedLibraryFiles,
displayId,
overrideConfig,
compatInfo,
classLoader);
}

ResourceManager是个单例, 内部维护了以ResourcesKey为key的ResourcesImpl缓存集合, 当调用getResources的时候, 首先会去match缓存中的resourceImpl, 当无法命中的情况下, 则创建新的ResourceImpl对象, ResourceImplResource的具体实现

1
2
3
4
5
6
7
8
9
10
11
12
13
14
15
16
17
18
19
20
public @Nullable Resources getResources(@Nullable IBinder activityToken,
@Nullable String resDir,
@Nullable String[] splitResDirs,
@Nullable String[] overlayDirs,
@Nullable String[] libDirs,
int displayId,
@Nullable Configuration overrideConfig,
@NonNull CompatibilityInfo compatInfo,
@Nullable ClassLoader classLoader) {
final ResourcesKey key = new ResourcesKey(
resDir,
splitResDirs,
overlayDirs,
libDirs,
displayId,
overrideConfig != null ? new Configuration(overrideConfig) : null, // Copy
compatInfo);
classLoader = classLoader != null ? classLoader : ClassLoader.getSystemClassLoader();
return getOrCreateResources(activityToken, key, classLoader);
}

我们可以看下新建Resource的相关代码

1
2
3
4
5
6
7
8
9
10
11
12
13
14
15
16
17
18
19
20
21
22
23
24
25
26
27
28
29
30
31
32
33
34
private @Nullable Resources getOrCreateResources(@Nullable IBinder activityToken,
@NonNull ResourcesKey key, @NonNull ClassLoader classLoader) {
synchronized (this) {
// 省略掉通过getOrCreateResourcesForActivityLocked / getOrCreateResourcesLocked查找缓存的相关代码逻辑
...

// If we're here, we didn't find a suitable ResourcesImpl to use, so create one now.
// 如果不存在对应的缓存, 则新建ResourcesImpl对象
ResourcesImpl resourcesImpl = createResourcesImpl(key);
if (resourcesImpl == null) {
return null;
}

synchronized (this) {
ResourcesImpl existingResourcesImpl = findResourcesImplForKeyLocked(key);
if (existingResourcesImpl != null) {
resourcesImpl.getAssets().close();
resourcesImpl = existingResourcesImpl;
} else {
// Add this ResourcesImpl to the cache.
// 缓存更新
mResourceImpls.put(key, new WeakReference<>(resourcesImpl));
}

final Resources resources;
if (activityToken != null) {
resources = getOrCreateResourcesForActivityLocked(activityToken, classLoader,
resourcesImpl, key.mCompatInfo);
} else {
resources = getOrCreateResourcesLocked(classLoader, resourcesImpl, key.mCompatInfo);
}
return resources;
}
}
1
2
3
4
5
6
7
8
9
10
11
12
13
14
15
16
17
private @Nullable ResourcesImpl createResourcesImpl(@NonNull ResourcesKey key) {
final DisplayAdjustments daj = new DisplayAdjustments(key.mOverrideConfiguration);
daj.setCompatibilityInfo(key.mCompatInfo);

// 创建AssertManager
final AssetManager assets = createAssetManager(key);
if (assets == null) {
return null;
}

final DisplayMetrics dm = getDisplayMetrics(key.mDisplayId, daj);
final Configuration config = generateConfig(key, dm);
// 创建新的 ResourcesImpl 对象, 并持有AssetManager对象引用
final ResourcesImpl impl = new ResourcesImpl(assets, dm, config, daj);

return impl;
}
1
2
3
4
5
6
7
8
9
10
11
12
13
14
15
16
17
18
19
20
21
22
23
24
25
26
27
28
29
30
31
32
33
34
35
36
37
38
39
40
41
42
protected @Nullable AssetManager createAssetManager(@NonNull final ResourcesKey key) {
AssetManager assets = new AssetManager();

// resDir can be null if the 'android' package is creating a new Resources object.
// This is fine, since each AssetManager automatically loads the 'android' package
// already.
if (key.mResDir != null) {
if (assets.addAssetPath(key.mResDir) == 0) {
Log.e(TAG, "failed to add asset path " + key.mResDir);
return null;
}
}

if (key.mSplitResDirs != null) {
for (final String splitResDir : key.mSplitResDirs) {
if (assets.addAssetPath(splitResDir) == 0) {
Log.e(TAG, "failed to add split asset path " + splitResDir);
return null;
}
}
}

if (key.mOverlayDirs != null) {
for (final String idmapPath : key.mOverlayDirs) {
assets.addOverlayPath(idmapPath);
}
}

if (key.mLibDirs != null) {
for (final String libDir : key.mLibDirs) {
if (libDir.endsWith(".apk")) {
// Avoid opening files we know do not have resources,
// like code-only .jar files.
if (assets.addAssetPathAsSharedLibrary(libDir) == 0) {
Log.w(TAG, "Asset path '" + libDir +
"' does not exist or contains no resources.");
}
}
}
}
return assets;
}

可以看到, 创建Resource, 主要是新建AssertManager对象, 通过addAssetPath方法新增资源对应路径维护, 并将对应实例由新建的ResourceImpl对象内部持有. 而Resource的真正实现类为ResourceImpl, 以Resource#getString为例, 它通过mResourcesImpl.getAssets().getResourceText(id)实现, 可以看出, 针对资源的访问, 最终都是与AssertManager有关, 相关简化流程可看下图

资源获取流程

那么如果我们来做资源修复, 应该就是需要针对ResourceManager单例里维护的Resources缓存进行处理, 使得对应创建Resource的时候, 可以通过AssertManager#addAssetPath新增新的资源路径达到资源修复的效果.下面我们来看下Tinker是怎么做的.

Tinker资源修复

上一大节, 我们知道资源修复相关入口代码在TinkerResourceLoader#loadTinkerResources

1
2
3
4
5
6
7
8
9
10
11
12
13
14
public static boolean loadTinkerResources(TinkerApplication application, String directory, Intent intentResult) {
if (resPatchInfo == null || resPatchInfo.resArscMd5 == null) {
return true;
}
String resourceString = directory + "/" + RESOURCE_PATH + "/" + RESOURCE_FILE;
File resourceFile = new File(resourceString);
// 省略安全校验代码
...
// 删除加载失败情况下卸载补丁的相关catch代码
TinkerResourcePatcher.monkeyPatchExistingResources(application, resourceString);
// 忽略tiker针对运行时资源加载的监控相关代码
...
return true;
}

然后是资源修复的核心代码, 继续往下看

1
2
3
4
5
6
7
8
9
10
11
12
13
14
15
16
17
18
19
20
21
22
23
24
25
26
27
28
29
30
31
32
33
34
35
36
37
38
39
40
41
42
43
44
45
46
47
48
49
50
51
52
53
54
55
56
57
58
59
60
61
62
63
64
65
66
67
68
69
70
71
72
73
74
75
76
77
78
79
80
public static void monkeyPatchExistingResources(Context context, String externalResourceFile) throws Throwable {

final ApplicationInfo appInfo = context.getApplicationInfo();

final Field[] packagesFields;
// packagesFiled 为 ActivityThread里的mPackages对象, 为ArrayMap类型, key为包名, value为LoadedApk
// resourcePackagesFiled 为 ActivityThread里的mResourcePackages对象, 为ArrayMap类型, key为包名, value为LoadedApk
if (Build.VERSION.SDK_INT < 27) {
packagesFields = new Field[]{packagesFiled, resourcePackagesFiled};
} else {
packagesFields = new Field[]{packagesFiled};
}
// 遍历 packagesFields, 获取所有loadedApk
for (Field field : packagesFields) {
final Object value = field.get(currentActivityThread);

for (Map.Entry<String, WeakReference<?>> entry
: ((Map<String, WeakReference<?>>) value).entrySet()) {
final Object loadedApk = entry.getValue().get();
if (loadedApk == null) {
continue;
}
// resDir 为LoadedApk内mResDir对象, 即资源文件路径
final String resDirPath = (String) resDir.get(loadedApk);
if (appInfo.sourceDir.equals(resDirPath)) {
// 通过hook 将resDir设置为补丁资源文件路径
resDir.set(loadedApk, externalResourceFile);
}
}
}

// Create a new AssetManager instance and point it to the resources installed under
// 创建新的assetManager对象, 并且通过反射调用addAssetPath方法, 添加补丁资源路径
if (((Integer) addAssetPathMethod.invoke(newAssetManager, externalResourceFile)) == 0) {
throw new IllegalStateException("Could not create new AssetManager");
}

// Kitkat needs this method call, Lollipop doesn't. However, it doesn't seem to cause any harm
// in L, so we do it unconditionally.
if (stringBlocksField != null && ensureStringBlocksMethod != null) {
stringBlocksField.set(newAssetManager, null);
ensureStringBlocksMethod.invoke(newAssetManager);
}

// 遍历ResourceManager内的resource缓存集合
// 进行遍历
for (WeakReference<Resources> wr : references) {
final Resources resources = wr.get();
if (resources == null) {
continue;
}
// Set the AssetManager of the Resources instance to our brand new one
// 将resourceImpl内的mAssets对象通过hook设置为上面新建的assertManager
try {
//pre-N
// assetsFiled 为 resourceImpl内的mAssets
// 将resourceImpl内的assertManager对象替换为我们新建的对象
assetsFiled.set(resources, newAssetManager);
} catch (Throwable ignore) {
// N
final Object resourceImpl = resourcesImplFiled.get(resources);
// for Huawei HwResourcesImpl
final Field implAssets = findField(resourceImpl, "mAssets");
implAssets.set(resourceImpl, newAssetManager);
}

// Resources内部存在针对TypedArrays的缓存池, 需要清除, 防止获取到的还是老的资源
clearPreloadTypedArrayIssue(resources);

// 更新资源
resources.updateConfiguration(resources.getConfiguration(), resources.getDisplayMetrics());
}
// 忽略Android N上针对webview的问题适配
...

// 通过打开补丁里的only_use_to_test_tinker_resource.txt tinker内部测试资源文件, 来验证资源是否加载成功
if (!checkResUpdate(context)) {
throw new TinkerRuntimeException(ShareConstants.CHECK_RES_INSTALL_FAIL);
}
}

可以看出Tinker的资源修复步骤如下:

  1. 通过hook获取apk描述文件loadedApk, 通过hook设置内部维护mRes为资源补丁路径
  2. 新建AssetManager, 通过AssetManager#addAssetPath增加资源补丁路径, 通过hook获取ResourceManager内的resources缓存, hook设置ResourceImpl内持有的mAsset为新建的AssetManager
  3. 清除TypedArrays缓存池, 更新资源

参考